Setting Up a VM on Linux/Windows and Mac (intel chips)
For the first project, you will need to work on a Linux kernel. Since different kernel versions may have differences that can be problematic for the project, we (highly) recommend using the VM image provided in this tutorial, which uses kernel 6.8.0-53-generic.
Installing VirtualBox
Danger
If you have a recent Macbook (with a m1 chip), skip VirtualBox steps and go here instead.
Note
On Linux, you should be able to install VirtualBox from the official repositories (e.g. sudo apt install virtualbox, sudo dnf install VirtualBox etc) without needing to follow all the steps described on the official website.
First download the VirtualBox installer from official web page according to your OS. After finishing the download, launch the installer and follow the instruction of the installer. VirtualBox is a virtualization software which allows you to create VMs that run OSes, including Linux, on your computer without removing your currently-using OS such as Windows and macOS. In this course, we execute Linux on the VM made by VirtualBox.
Download the reference VM image
Download the reference VM image from this link.
We use this image for the course. TAs might not be able to help if you use other VM images prepared by yourself.
The image contains Ubuntu 24.04.1 LTS 64 bit.
The default user of the VM image is student. The password for the user is also student.
Launch the downloaded VM image on VirtualBox
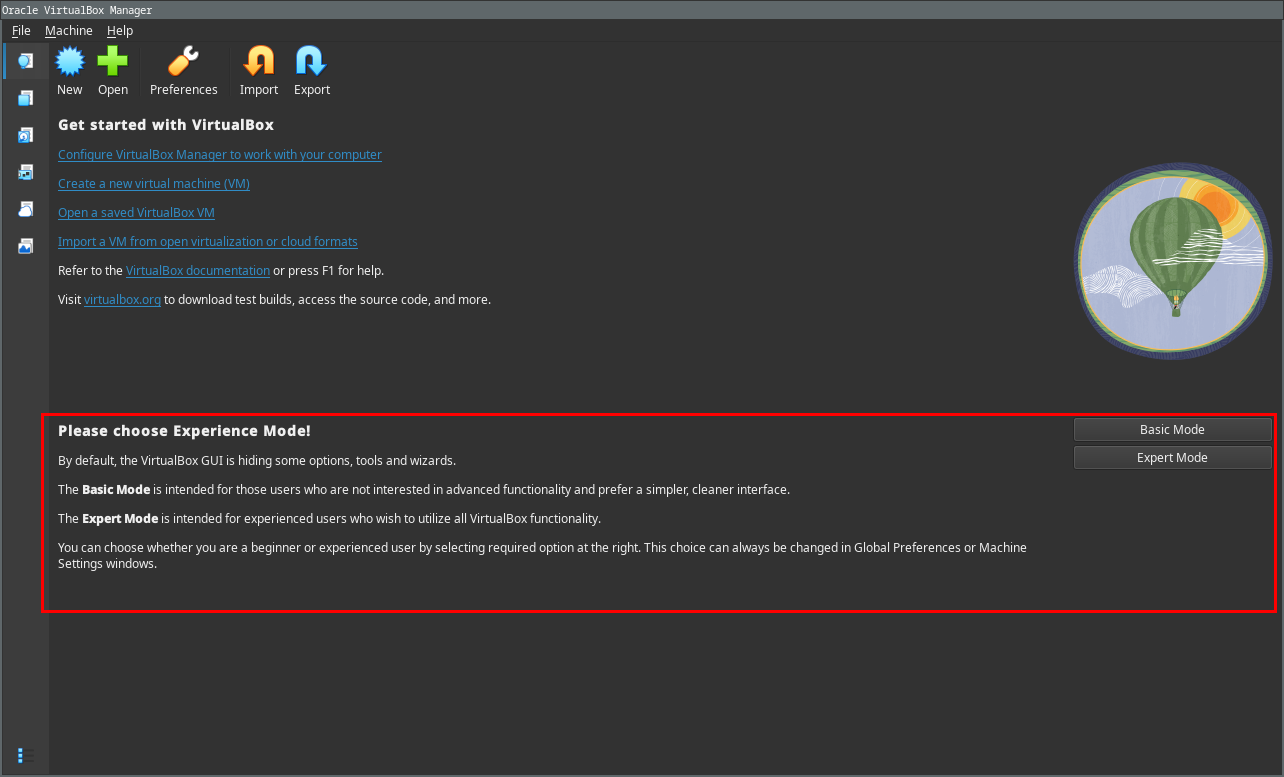
First of all, if you have a message that asks you to choose your experience mode, select “Expert Mode”.
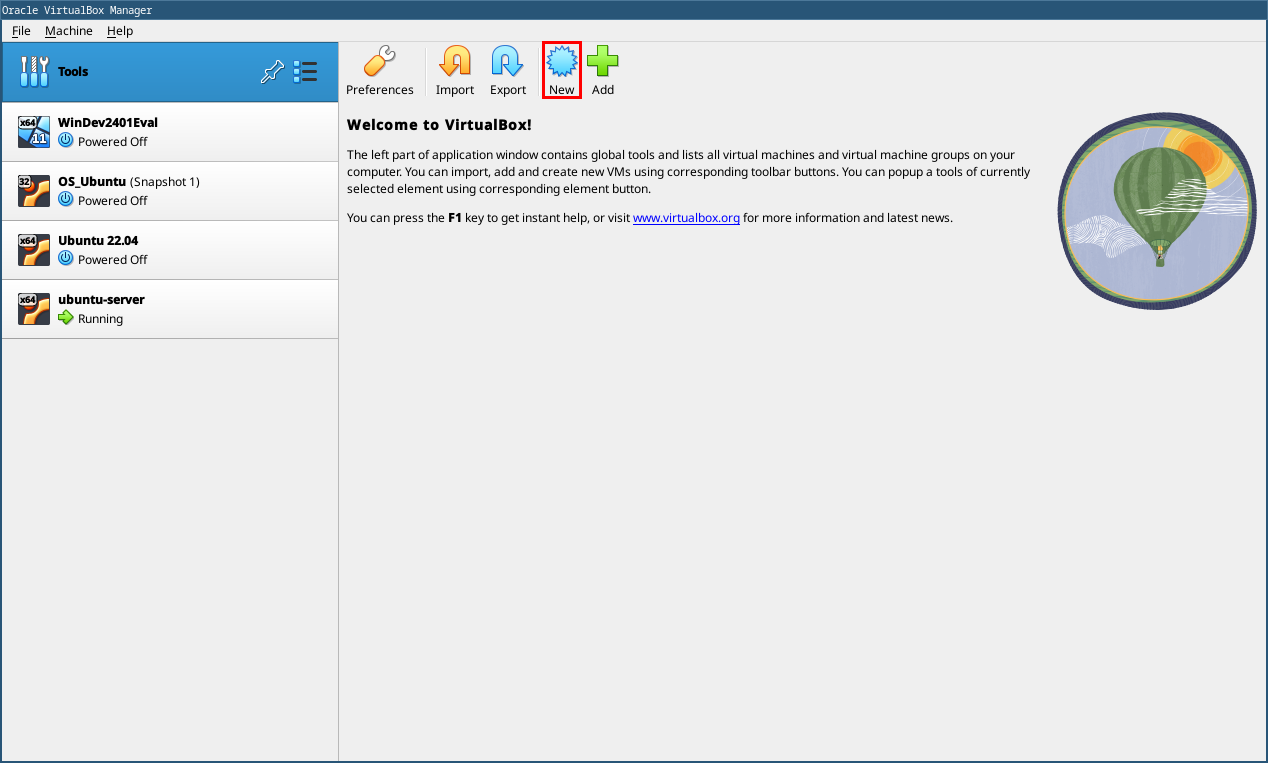
We will create a new virtual machine based on the reference image:
Click on the “New” icon in the toolbar to launch the creation wizard and create a new VM.
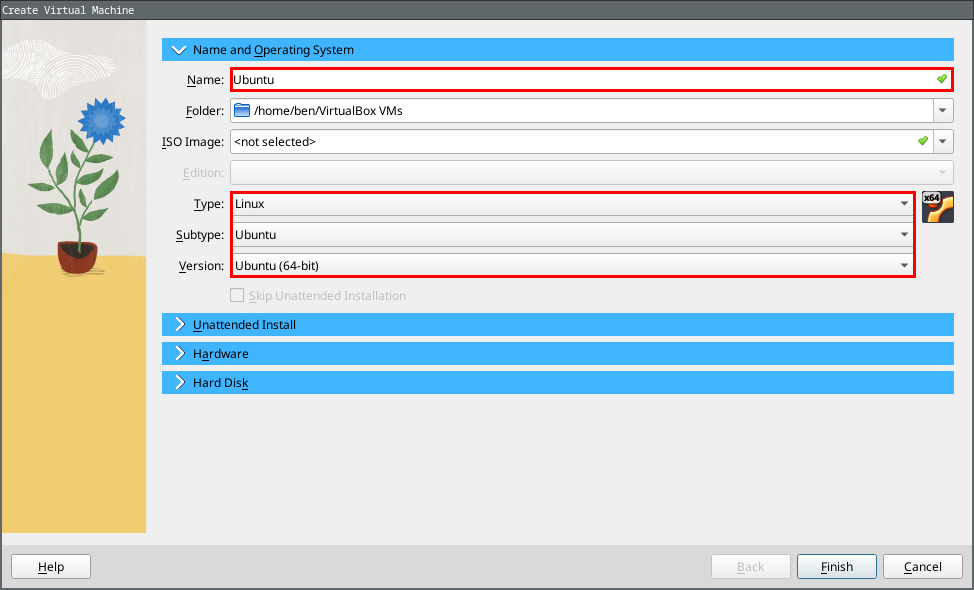
The first thing to do is to define the name, the type of virtual machine and the version you want to create. In our case, we chose to name the machine
Ubuntu. The type will be Linux, Ubuntu (64 bit).
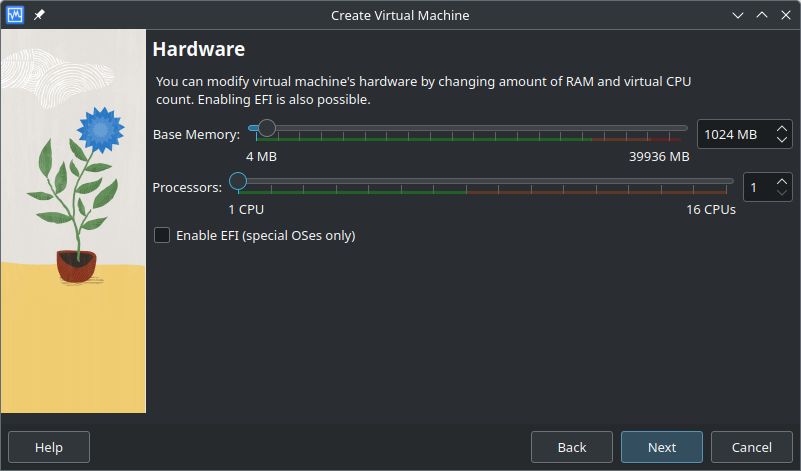
You can skip the “Unattended Install step”. Next, you need to define the amount of memory and CPUs to be allocated to the virtual machine. These resources will be provided by the host system each time the virtual machine is started. You have to make sure not to go below the recommended minimum. In addition, you must also make sure to leave enough memory and CPUs for the host operating system to continue running. We recommend a minimum of 2048MB but if you have enough memory on your system, you can slide the bar up. You should not need more than 1 CPU but you can have more if you want.
4. The next step is to use a virtual hard disk. Like shared memory, this is the storage space that will be allocated to the virtual machine. In this case, we will use the virtual hard disk you downloaded (ubuntu-server.vdi). Click the “Use an existing virtual hard disk file” option, then “Chooses a Virtual Hard Disk File …”. A new window will open. Click on the “Add” button then select the file
ubuntu-server.vdi by browsing your file explore (it should normally be in your “Downloads” folder).
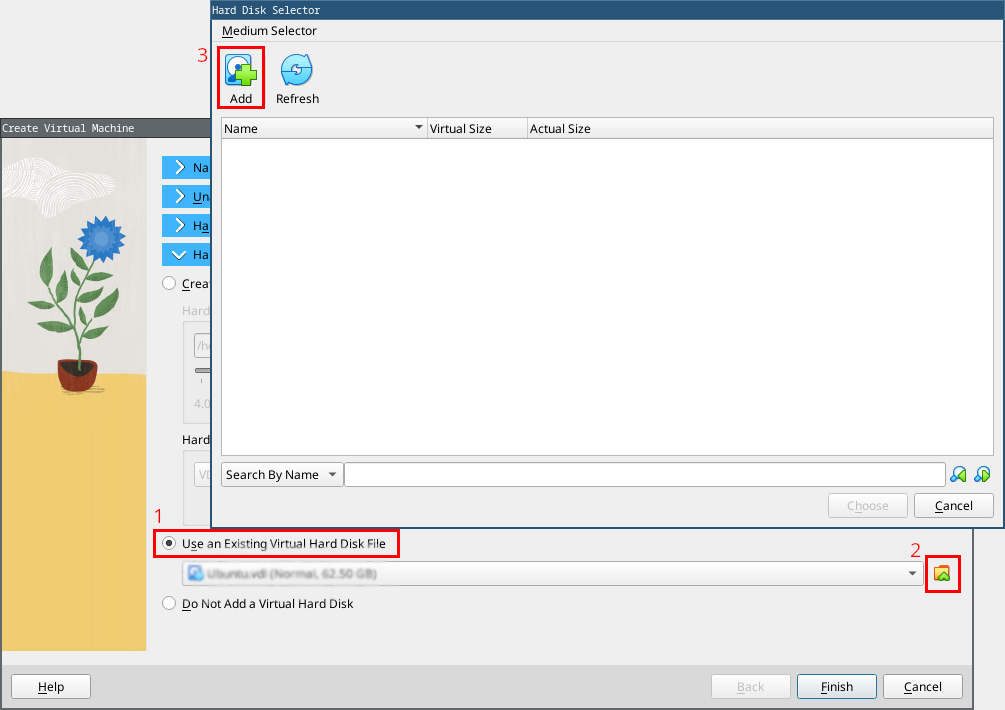
Once you have selected the file in the file explorer, select it again in the modal window and click on the “Choose” button. Finally, click on the “Finish” button to create the virtual machine.

The virtual machine has now been created. You can launch it by pressing the “Start” button located at the top of the toolbar.
Note
When ssh will have been configured, you will be able to do a “Headless Start” and connect to the VM from your shell.

Once the initialization phase is complete, the console login screen appears. The password to log in is the same as the user name, i.e.
student.
Danger
If your VM does not boot it may be related to the VT-x technology in most cases. To handle this issue, shutdown your (host) machine, open your BIOS settings, and enable Virtual Technology-x option. Finally restart your machine and test again.
Danger
Another common issue is kvm modules and vbox* modules competing with each other. To solve this issue, you can try the following commands (more details here):
$ sudo rmmod kvm_amd; sudo rmmod kvm
Note
Do not copy the dollar sign. It is a convention to indicate that the command should be run in a terminal.
If you still have issues, you can try to install the VirtualBox Extension Pack. This pack provides support for USB 2.0 and USB 3.0 devices, VirtualBox RDP, disk encryption, NVMe and PXE boot for Intel cards. You can try the following commands to install the extension pack:
$ sudo apt-get autoremove virtualbox-dkms
$ sudo apt-get install build-essential linux-headers-`uname -r` dkms virtualbox-dkms
$ sudo modprobe vboxdrv
$ sudo modprobe vboxnetflt
Connect to the VM via ssh
In order to connect to a VM using ssh, we need a special network setup in VirtualBox. Four of the network cards can be configured in the Network section of the Settings dialog in the graphical user interface of Oracle VM VirtualBox.
- NAT: VirtualBox act as a normal process which tries to access the web when the VM initiates a connection (default).
+Simple.
-Virtual machine not accessible from outside, not even from host.
- Bridge: VirtualBox plugs itself to the real card, and acts as if you used a switch.
+Access from outside (from the world only if you get public IP address).
-Don’t work with Wifi (do not work on ULiège Wifi, but does work on ms8xx machines).
- Internal Network: Network between VMs, invisible to the host or the outside.
+Secure communication between VMs.
-No access to or from host or outside (no internet).
- Host private network: Like internal network but creates a virtual interface on the host too.
+Fine-tuning is possible (router on the host, …).
-Internet connection tricky to configure (create a router between virtual interface on host and the real. interface).
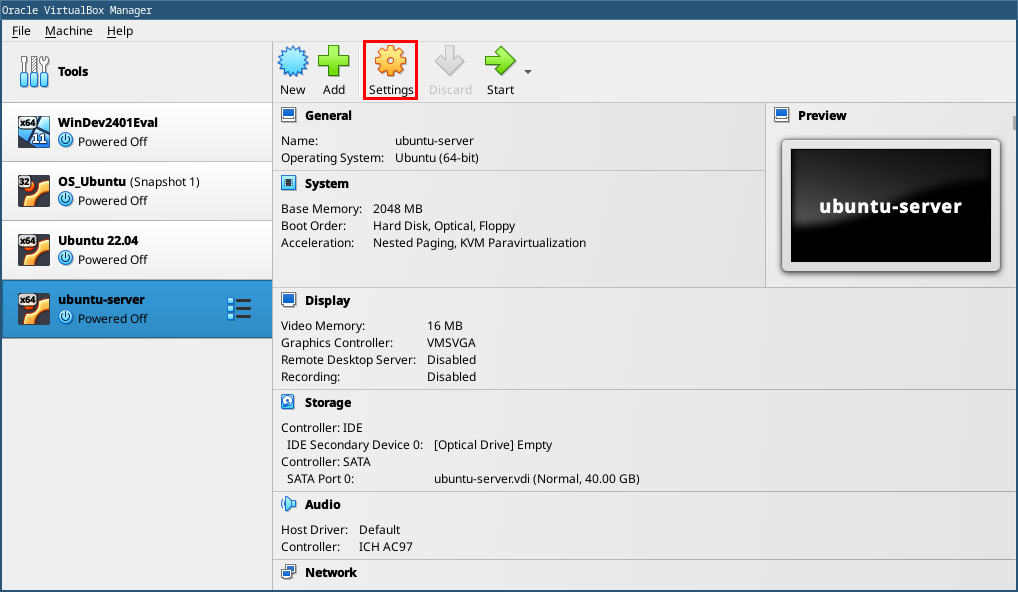
In our case, we will use NAT Network (default option). In order to configure this mode, click on “Settings”, and choose “Network” tab in the settings menu.
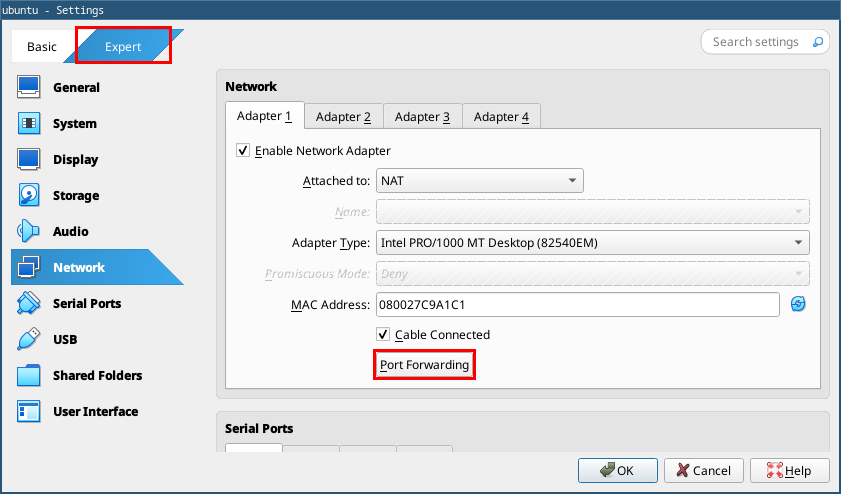
Then choose “Port Forwarding”. If the option isn’t available, it’s because you need to activate the “Expert” Mode (top left corner).
Finally, click on the green “+” button, and type the following information. This allows to connect to the remote virtual machine through localhost by using the “6543” port on the host machine (your computer).
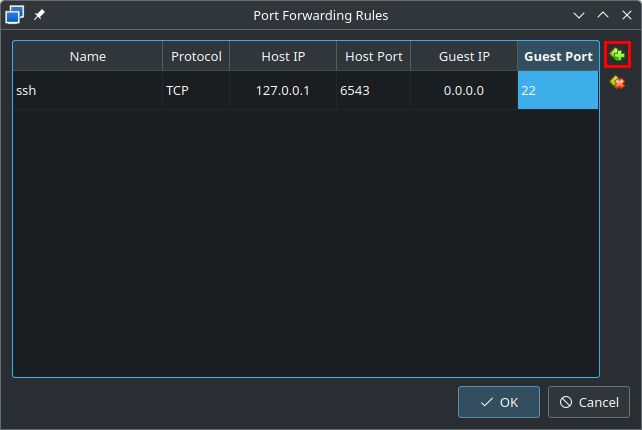
Further details about the configuration:
Name: ssh (anything would be fine)
Protocol: TCP
Host IP: 127.0.0.1 (localhost)
Host Port: 6543 (mostly any number [>1024] would be OK but remember it!)
Guest Port: 22 (ssh port)
Connect to the VM by ssh
Then open a terminal and enter the following commands:
$ ssh student@127.0.0.1 -p 6543
Note
Do not copy the dollar sign. It is a convention to indicate that the command should be run in a terminal.
The VM will ask your password. Use the “student” credentials. Note that if you are using Windows, you can use PowerShell or CommandPrompt or putty.
Update package information
Finally, enter the following command on your terminal app after connecting to the VM by ssh:
$ sudo apt update
Tip
It is possible that your keyboard layout is not correctly set. You can change it by running the following command:
sudo loadkeys be (replace “be” by “fr” or “us” depending on your keyboard layout)
In a nutshell, this command updates the package lists for upgrades for packages that need upgrading, as well as new packages that have just come to the repositories.
sudomeans “superuser do” and is used to run commands with administrative privileges.aptis the packet manager for some Linux distributions, including Ubuntu. You can see it as the equivalent of the “Google Play Store” or “App Store” for Linux.updateis the parameter for theaptcommand.
Note that, apt update does not actually install new versions of software.
After running this command, you can install apps/utilities via the apt install command:
$ sudo apt install gcc make bison flex libncurses-dev openssh-server git curl wget bc
Danger
NEVER upgrade the kernel of the VM. The kernel version is 5.8.0-53-generic. If you upgrade the kernel, you may face issues with the project.
General usage of the VM
Since you do not need one for this course, no graphical interface is installed on the VM. You will have to use the command line interface (CLI) to interact with the VM. The next tutorial (next week) will explain how to use the CLI in more details. This week, you will only learn the basic commands.
Here are some tips to help you:
When you will launch a program in the foreground, you won’t be able to use the terminal until the program is finished. This can be quite annoying. For example when writing code, you will need to stop your editor each time you want to compile and/or execute your code. Fortunately, you are not limited to a single terminal. You can open as many terminals as you want and open as many
sshconnections as you want.To kill a program running in the foreground, you can sometimes use the following command::
Ctrl+C.To shut down the VM, you can use the following command:
$ sudo shutdown now
If you simply want to exit the
sshconnection without shutting down the VM, you can pressCtrl+Dor type the following command:$ exit