Useful Commands
Now that you know some basic information about the shell, let’s look at some useful commands that you can use to interact with it.
The commands are going to be divided into four categories:
Navigation:
cd,ls,pwd,find,locateManaging Files:
mv,cp,rm,mkdir,rmdir,scp,rsyncShowing Data:
less,cat,head,tailFilter/Modify Data:
grep,sort,uniq,diff,awk
You will not need to use all these commands for the projects, but they will help you if you plan on using the shell for other tasks (not only for this course). Therefore, feel free to skip sections that you are already familiar with or won’t be useful for you. The important commands are marked with a star (*).
Tip
Don’t forget that you can always use the manual pages to get more
information about a command. For example, if you do not understand the
“-name” option of the find command, you can type man find to open
the manual page for find. To search for a specific word, press / and
type the word you want to search for and press enter, then press n
to go to the next occurrence of the word. In this case, press /-name to
search for the “-name” option, then press n twice.
To navigate in the manual page, you can use the arrow keys, or the j and
k keys to move up and down.
To close the manual page, press q.
Note on Expansions
Before we start, let’s talk about expansions. The shell will expand some basic expansion:
Filename Expansions: * (any number of characters), ? (any single character), […] (any character in the brackets).
$ echo *.pdf
OperatingSystemConcepts-10th.pdf
Shell variable expansions: $VAR or ${VAR}.
$ echo "This is my username: ${USER}."
This is my username: student.
Tilde expansion: The tilde character
~, which was presented in the previous section, is also an expansion.Command substitution:
$(command)or`command`. The command is executed, and the output is substituted in the command line.
$ echo "The current date is $(date)."
The current date is Thu Feb 30 05:01:50 PM UTC 2025.
Be careful that expansions are performed before executing the command. Sometimes, you will want to pass a character to a command without expanding it. If you do not want the shell to expand a character, you can use:
Double quotes:
". Variables are expanded, but not wildcards.Single quotes:
'. No expansion at all.
(In the next example, suppose you have a single pdf file in your current directory named “OperatingSystemConcepts-10th.pdf” and multiple pdf files in subdirectories. Explanations on the find command will be given later in this tutorial.)
$ find . -name *.pdf    # Here, the actual command that is executed is "find . -name OperatingSystemConcepts-10th.pdf"
./OperatingSystemConcepts-10th.pdf
$ find . -name "*.pdf"  # Here, *.pdf is passed as is to the find command.
./notes/meetings/final_presentation.pdf
./notes/meetings/meeting1.pdf
# [...] (Many other pdf files. Not showed here for brevity)
./OperatingSystemConcepts-10th.pdf

$ echo $USER "$USER" '$USER'
student student $USER
Managing Files
mv*: Move files. This is also used to rename files.cp*: Copy files.rm*: Remove files.mkdir*: Create directories.rmdir: Remove directories. However it only works if the directory is empty. Therefore,rm -ris more commonly used (but also more dangerous as it will remove everything in the directory and subdirectories).
$ mkdir temp
$ cd temp
$ touch file_a
$ ls
file_a
$ mv file_a file_b
$ cp file_b file_c
$ ls
file_b file_c
$ rm file_c
$ ls
file_b
$ cd ..
$ rmdir temp
rmdir: failed to remove 'temp': Directory not empty
$ rm -r temp   # or "rm temp/file_b" and then "rmdir temp" will work
scp*: Secure copy. This is used to copy files between two machines. It uses the SSH protocol to transfer the files.
This is useful for you if you want to copy files from your local machine to your VM, or from your VM to your local machine:
$ # To copy the file main.c from your VM to your local machine:
$ scp -P 6543 student@localhost:/home/student/main.c /home/jul/dev/
main.c           100%   12KB 369.4KB/s   00:00

$ # The other way around:
$ scp -P 6543 /home/jul/dev/main.c student@localhost:/home/student/
main.c           100%   12KB 369.2KB/s   00:00
Tip
If you used a key name different from the default, you can use the
-i option to specify the key file (e.g., scp -i
~/.ssh/info0940_id_rsa […]).
rsync*: Remote sync. This is used to synchronize files between two directories.
It is similar to scp, but it is more powerful and can be used to
synchronize whole directories. But the syntax is a bit less intuitive:
$ # To synchronize or copy ~/code from the VM with ~/dev/code on your local machine:
$ rsync -e "ssh -p 6543" -avz --progress student@localhost:/home/student/code/ /home/KingKRool/dev/code
[…]

$ # The other way around:
$ rsync -e "ssh -p 6543" -avz --progress /home/KingKRool/dev/code/ student@localhost:/home/student/code
[…]
Tip
Same remark about the key file as for scp. Use rsync -e "ssh -i
~/.ssh/info0940_id_rsa […] if you used a different key.
Showing Data
What we mean by “data” can be the content of a file, the output of a command, etc.
To show data, you can of course use your favourite editor:
$ nvim hello_world.c
But sometimes, it is more convenient to use a command line tool to quickly check some data (especially if you are using slow to start editors like VS Code).
less: Show the content of the data, one page at a time. You can use the arrow keys or thejandkkeys to move up and down. Pressqto quit.
less is actually the tool that is used when you run man to show the
manual pages.
less hello_world.c
cat*: Show the content of the data on the standard output (the terminal by default).
cat hello_world.c
Note
It is named “cat” because it can concatenate files. If you run
cat file1 file2, it will show the content of file1 and then the
content of file2.
bat: If the content to show is sufficiently short, it will print it directly to the terminal. If it is too long, it will behave likeless. In addition, it will add syntax highlighting.
bat is a modern replacement for cat, but it is not installed by default.
$ sudo apt install bat
$ batcat hello_world.c  # some Linux distributions, such as Ubuntu, use "batcat" instead of "bat"
head: Show the first lines of a file.
Use “-n” to specify the number of lines to show. By default, it will show the first 10 lines.
$ seq 5 > seqs.txt    # Create a file with the numbers from 1 to 5
$ head -n 2 seqs.txt
1
2
tail: Show the last lines of a file.
$ seq 5 > seqs.txt
$ tail -n 2 seqs.txt
4
5
A useful option for tail is -f. This will show the last lines of the
file and then wait for new lines to be added. This is useful to monitor log
files, for example.
$ sudo tail -n 50 -f /var/log/syslog
# [50 last lines of syslog in real time]
Tip
Hit Ctrl+C to stop the tail -f command.
Filter/Modify Data
Chaining Commands With Pipe (|)*
One of the most powerful features of the shell is the ability to chain commands
together using pipes. The pipe character | is used to send the output of
one command to the input of another command.
$ cat README.md | grep example | wc -l
6
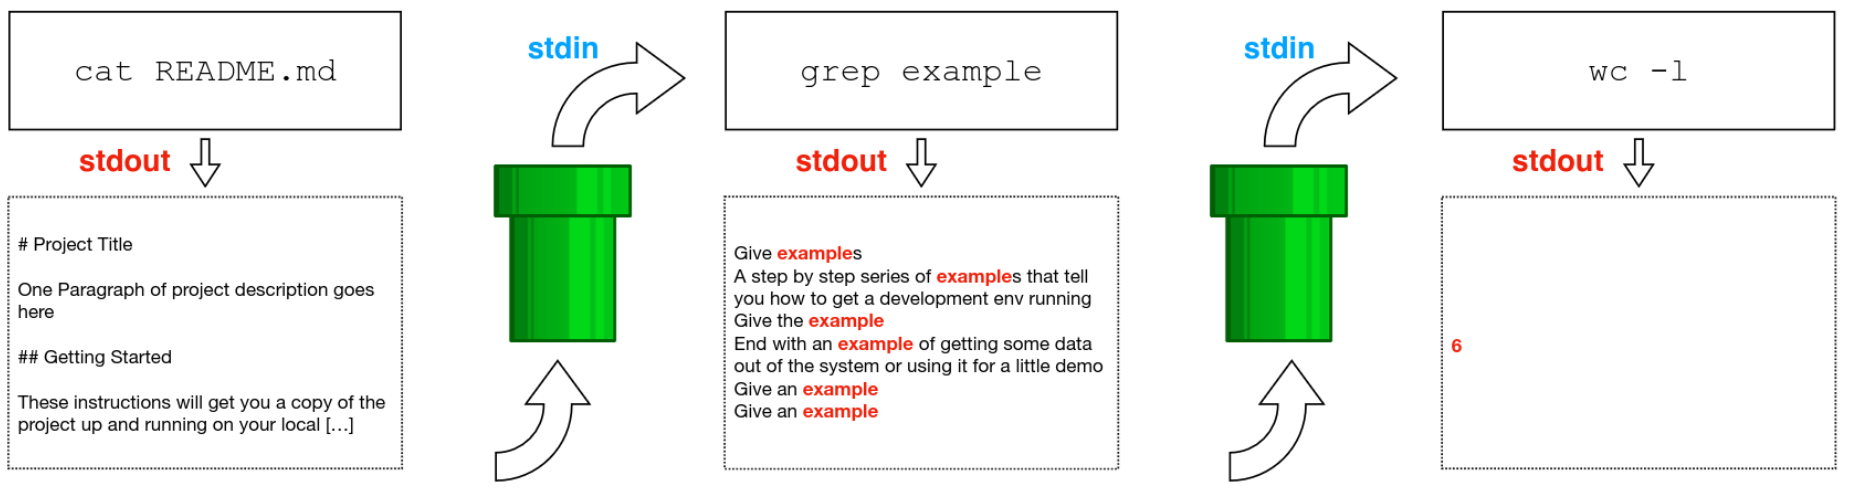
3 processes are created, outputs chained to inputs using so-called pipes. “stdin” is the standard input, “stdout” is the standard output.
grep*: Search for patterns in data.
This is one of the most useful commands. By default, it will show the lines that contain the pattern you are looking for.
Useful options are -i (case insensitive), -o (show only the matching
part), -E (use extended regular expressions), -v (show lines that
do not match), and -r [dir_name] (search recursively in the specified directory).
$ sudo cat /var/log/syslog | grep -oE "[0-9]{1,3}([.][0-9]{1,3}){3}" | sort | uniq
139.165.214.214
139.165.223.1
139.165.223.147
139.165.223.69
139.165.223.70
…
If you want to, here are small exercices to practice with grep (not mandatory):
Exercice: How would you use grep to find which version of Ubuntu you are using? You
know that you can use cat /etc/*release to get the information, but you
only want to see the line(s) where “LTS” is printed.
See answer
$ cat /etc/*release | grep "LTS"
DISTRIB_DESCRIPTION="Ubuntu 24.04.1 LTS"
PRETTY_NAME="Ubuntu 24.04.1 LTS"
VERSION="24.04.1 LTS (Noble Numbat)"
Exercice: How would you use grep to find out in which header file (in the
current directory) the function void setDistance(int) is declared?
Tip
If you use foo*bar in the shell, it will be expanded to all files
that start with “foo” and end with “bar”.
Tip
If you give file(s) as the last argument to grep, it will search
only in those files.
See answer
$ grep "void setDistance(int)" *.h
metrics.h:void setDistance(int) {
Exercice: You used the locate syslog command to find the syslog file,
but locate also matched directories and files which contain “syslog” in
their name (such as “test_syslog.py”) as well as files under directories which
contain “syslog” in their name (such as “/etc/apparmor.d/rsyslog.d/README”).
Therefore, your output si way too long for you to locate the file you are
looking for:
$ locate syslog
/etc/apparmor.d/local/usr.sbin.rsyslogd
/etc/apparmor.d/rsyslog.d
/etc/apparmor.d/rsyslog.d/README
/etc/apparmor.d/usr.sbin.rsyslogd
/etc/logcheck/ignore.d.server/rsyslog
# [...] (very long output)
How would you use grep to show only files and directories whose full name is “syslog”?
Tip
You can use the $ character to match the end of a line.
Tip
You can use \< and \> to match the start and end of a word.
See answer
$ locate syslog | grep "\<syslog$"
/run/systemd/journal/syslog
/var/log/syslog
sort: Sort lines.
An important option is -n (sort numerically instead of alphabetically).
uniq: Filter out duplicated lines.
Important options are -u (show only unique lines) and -d (show only
duplicated lines).
Used together, these two very simple tools can perform quite complex operations.
This is the content of the file setA (on Linux, you are not required to specify
the file extension):
Green
Red
Yellow
Blue
This is the content of the file setB:
Blue
White
Red
You can try to perform the following operations if you want to (not mandatory):
Exercice: Show the intersection of the two sets.
See answer
$ sort setA setB | uniq -d      # intersection
Blue
Red
Exercice: Show the union of the two sets.
See answer
$ sort setA setB | uniq         # union
Blue
Green
Red
White
Yellow
Exercice: Show the elements that are in set A but not in set B.
See answer
$ sort setA setB setB | uniq -u # complement (in A but not in B)
Green
Yellow
Exercice: Show a XOR of the two sets (elements that are in set A or in set B, but not in both).
See answer
$ sort setA setB | uniq -u      # xor
Green
White
Yellow
diff: Show the differences between two files.
If you are familiar with git, you probably already know the git diff
command. The diff command is similar, but it shows the differences between
two files.
This command can be relevant to you for example if the tests on the submission platform shows you your output and the expected output, and you want to quickly see the differences between the two outputs.
For example, consider that the submission platform shows you the following output:
Test 1: simple tests on all algorithms ... FAIL
FAIL, Outputs differ for FCFS algorithm
%%%%%% EXPECTED OUTPUT %%%%%%
----------------- Stats -----------------
PID | PRIORITY | ARRIVAL | FINISH | TURNAROUND | CPU | WAITING | RESPONSE | C. SWITCHES
  1 |        0 |       0 |     25 |         25 |  24 |       0 |     0.00 |           0
  2 |        0 |       1 |     29 |         28 |   3 |      24 |    24.00 |           0
  3 |        0 |       2 |     33 |         31 |   3 |      27 |    27.00 |           0
-----------------------------------------
%%%%%%%%%%%%%%%%%%%%%%%%%%%%%
%%%%%%%% YOUR OUTPUT %%%%%%%%
----------------- Stats -----------------
PID | PRIORITY | ARRIVAL | FINISH | TURNAROUND | CPU | WAITING | RESPONSE | C. SWITCHES
  1 |        0 |       0 |     25 |         25 |  24 |       0 |     0.00 |           0
  2 |        0 |       1 |     29 |         28 |   2 |      24 |    24.00 |           0
  3 |        0 |       2 |     33 |         31 |   3 |      27 |    27.00 |           0
-----------------------------------------
%%%%%%%%%%%%%%%%%%%%%%%%%%%%%
You can create two files, one with the expected output and one with your output, and then run the diff command to see the differences:
$ diff expected_output.txt your_output.txt   # you may want to add --color option to have colored output
4c4
<   2 |        0 |       1 |     29 |         28 |   3 |      24 |    24.00 |           0
---
>   2 |        0 |       1 |     29 |         28 |   2 |      24 |    24.00 |           0
It shows you that that the only line that is different is the line 4, and it shows you the content of the line in both files. In this case, the only difference is that the expected output shows “3” in the sixth column, while your output shows “2”.
Note
The “4c4” at the beginning of the output means that line 4 in the first file is different from line 4 in the second file. You generally do not need to care about this part, but it can be useful if you have a lot of differences and want to quickly locate them.
awk: A powerful text processing tool. It is a patter-directed scanning and processing language.
Awk assigns some variables for each data field found:
$0 for the whole line.
$1 for the first field.
$2 for the second field.
$n for the nth field.
The whitespace characters like spaces or tabs are the default separator between
fields in awk. You can change the separator with the -F option.
$ cat sample.txt | awk '{print $2}'
[print the second field of the sample.txt file]
$ awk -F: '{print $1}' /etc/passwd
[print the first field of /etc/passwd. Fields are separated by ":"]
Cheat Sheet
To have a condensed version of the different commands, check out “UNIX Commands (1)” and “UNIX Commands (2)” (where you will also find some commands to show OS information).
Go deeper
Two of the most powerful commands in the shell are sed and awk. We briefly
introduced awk in the previous section, but there are still many things to
cover.
If you are interested in learning more about these commands, you can check the “UNIX Commands (3)” section located in the “Others” category (after all the Tutorials) on the left side of the page.